How to Install and Use Gremlin Locally with Docker Desktop

This installation guide will walk you through running Gremlin locally using Docker for Mac, Windows or Linux. You will also run a shutdown attack against an Nginx container.
Prerequisites
- A Gremlin account
Create your Gremlin Free account
Step 1 - Install Docker Desktop
First you will need to install Docker Desktop if you do not yet have it on your local computer, follow the instructions provided by Docker.
You will likely need to restart your computer to install Docker Desktop. If you are using Windows you will likely get a prompt for a required kernel update.
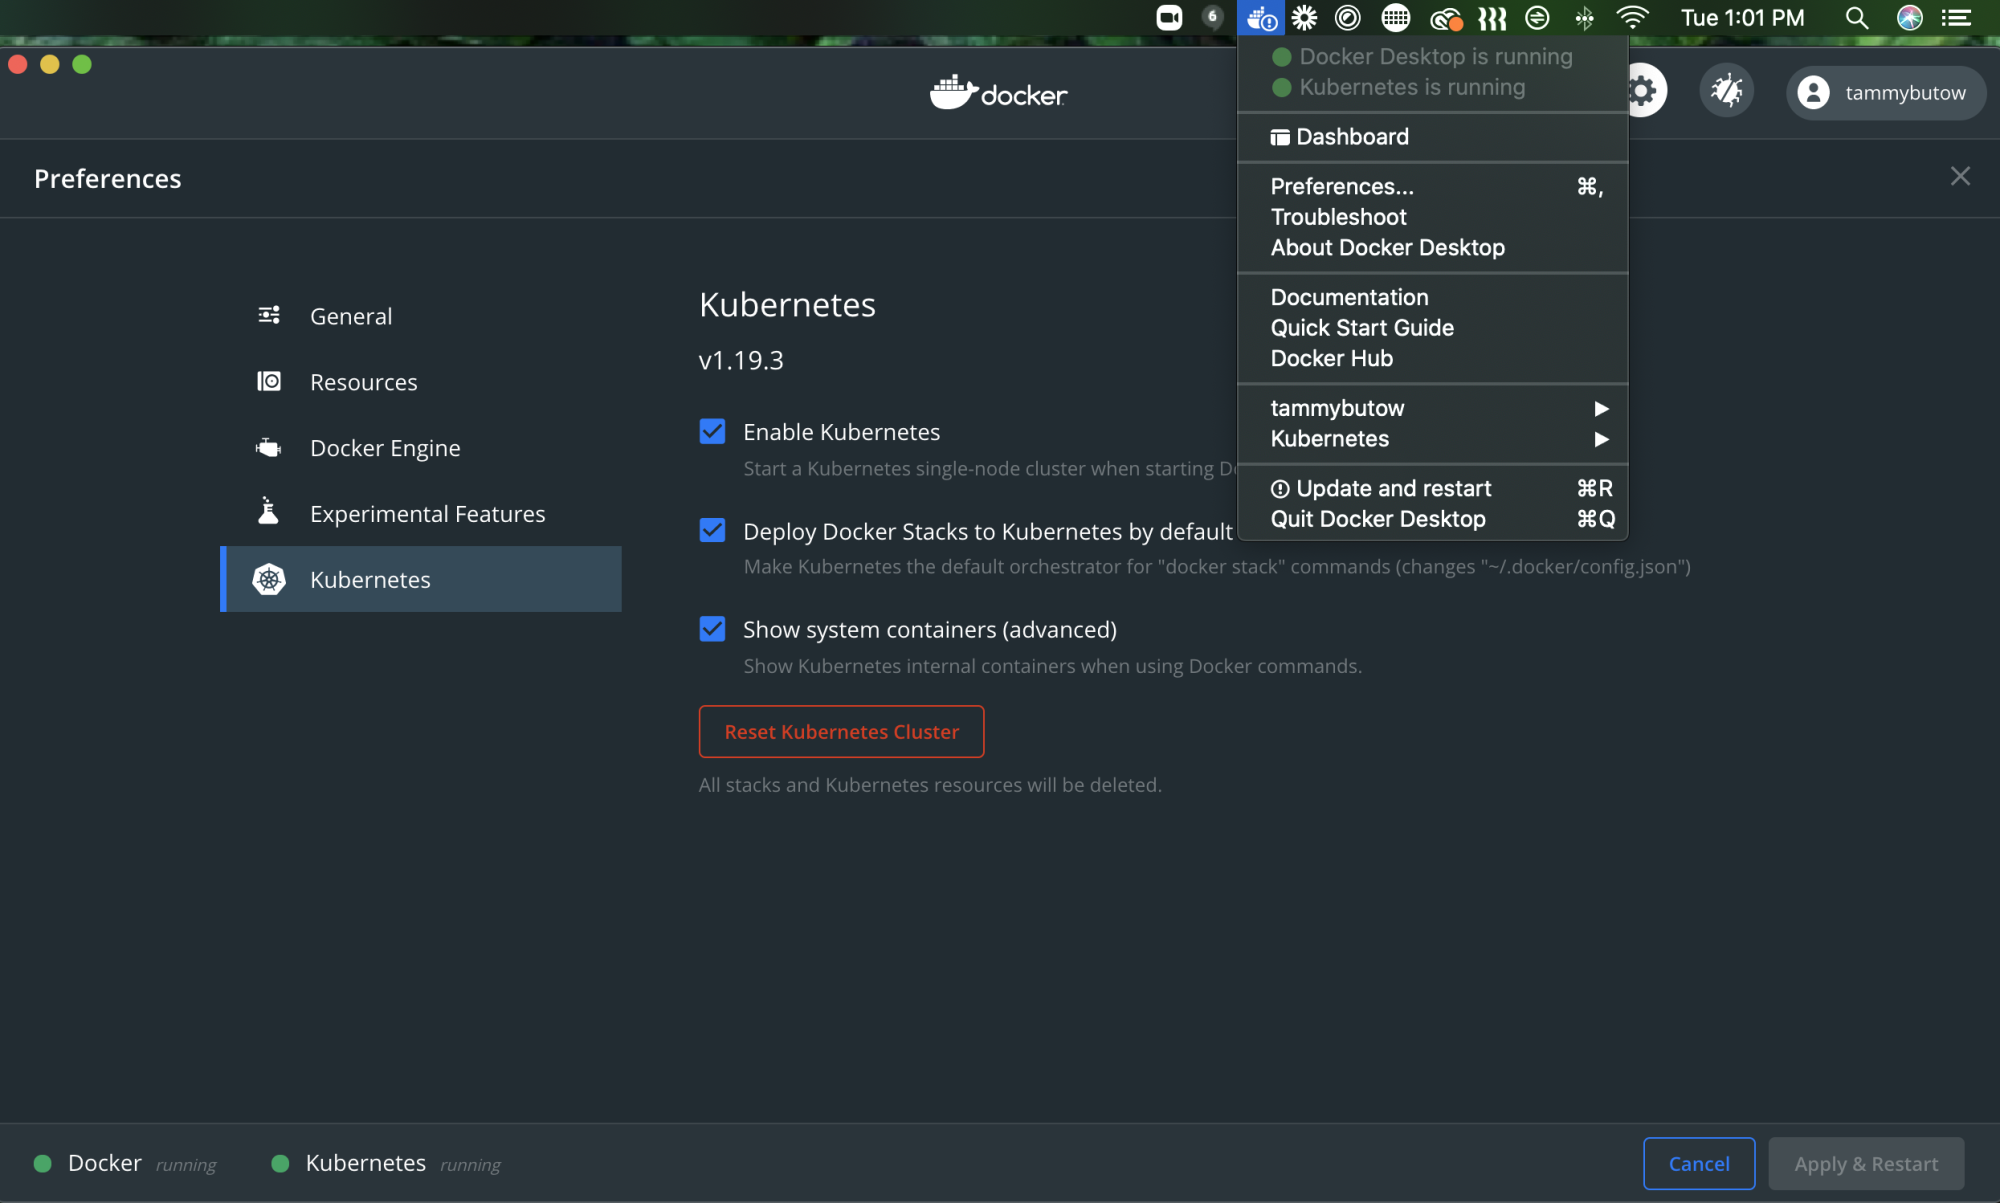
You'll see a little Docker icon (whale) in your menu bar. First, you'll need to sign in or create a Docker ID. Next, click on preferences within the Docker Desktop main menu, select Kubernetes, then click Enable Kubernetes. Click "Apply & Restart" to finish the installation.
Once Kubernetes is up and running, you'll get a green light and it will say "Kubernetes is running".

If you've used Docker Desktop before, make sure to select the correct Kubernetes context: click on the Docker Desktop icon in the menu bar, then select Kubernetes > docker-desktop.
Advanced: You can also set your context via the command line using kubectl.
Note: the Reset Kubernetes Cluster button within Preferences is very handy. If you break your cluster or do something wrong, the fastest way to get back to a clean slate is to just click that button.
Step 2 - Verify your Kubernetes cluster is up and running
Open Terminal (Mac/Linux) or Command Prompt (Windows) and check that your Kubernetes cluster is up and running by typing:
1kubectl get nodes
You should see a result similar to below:
1NAME STATUS ROLES AGE VERSION2docker-desktop Ready master 24s v1.19.3
Step 3 - Add the Gremlin Helm repo
First, install Helm. Once it's installed, open your Terminal/Command Prompt and type the following command to add the Gremlin Helm repository:
1helm repo add gremlin https://helm.gremlin.com
You should see a result similar to below:
1"gremlin" has been added to your repositories
Check to confirm you've added it correctly by running a test command:
1helm search repo
Step 4 - Create a Gremlin namespace
In Terminal/Command Prompt, type the following command to create a namespace for Gremlin to run in:
1kubectl create namespace gremlin
You should see a result similar to below:
1namespace/gremlin created
Step 5 - Find your Gremlin Team ID and Team Secret
You'll need your Gremlin team ID and secret, which you can get from the Gremlin web app. Log into the Gremlin web app, click on the user icon in the top-right corner, and select Team Settings. Click on the Configuration tab. You can create a new secret key if you haven't already. If you've already created one, you may need to reset your key.

Step 6 - Install the Gremlin Helm Chart
Run the following command to install the Gremlin Helm Chart, replacing the values YOUR-TEAM-ID, and YOUR-TEAM-SECRET with the values you obtained in step 5. You should also replace YOUR-CLUSTER-ID with whatever name you'd like to call your cluster, for example Tammy.
Run the following command in terminal/command prompt:
1helm install gremlin gremlin/gremlin --namespace gremlin --set gremlin.secret.managed=true --set gremlin.secret.type=secret --set gremlin.secret.teamID=YOUR-TEAM-ID --set gremlin.secret.clusterID=YOUR-CLUSTER-ID --set gremlin.secret.teamSecret=YOUR-TEAM-SECRET
Step 7 - Verify that your clusters are now up and running
Run the following command in terminal/command prompt:
1kubectl get pods -n gremlin
You should see the following:
1NAME READY STATUS RESTARTS AGE2chao-5c87fdf855-5gdp5 1/1 Running 0 11s3gremlin-6rhnb 1/1 Running 0 11s
If you see an error status for one of your pods, check to make sure your pods have access to the internet. Your pods will need to reach the Gremlin API.
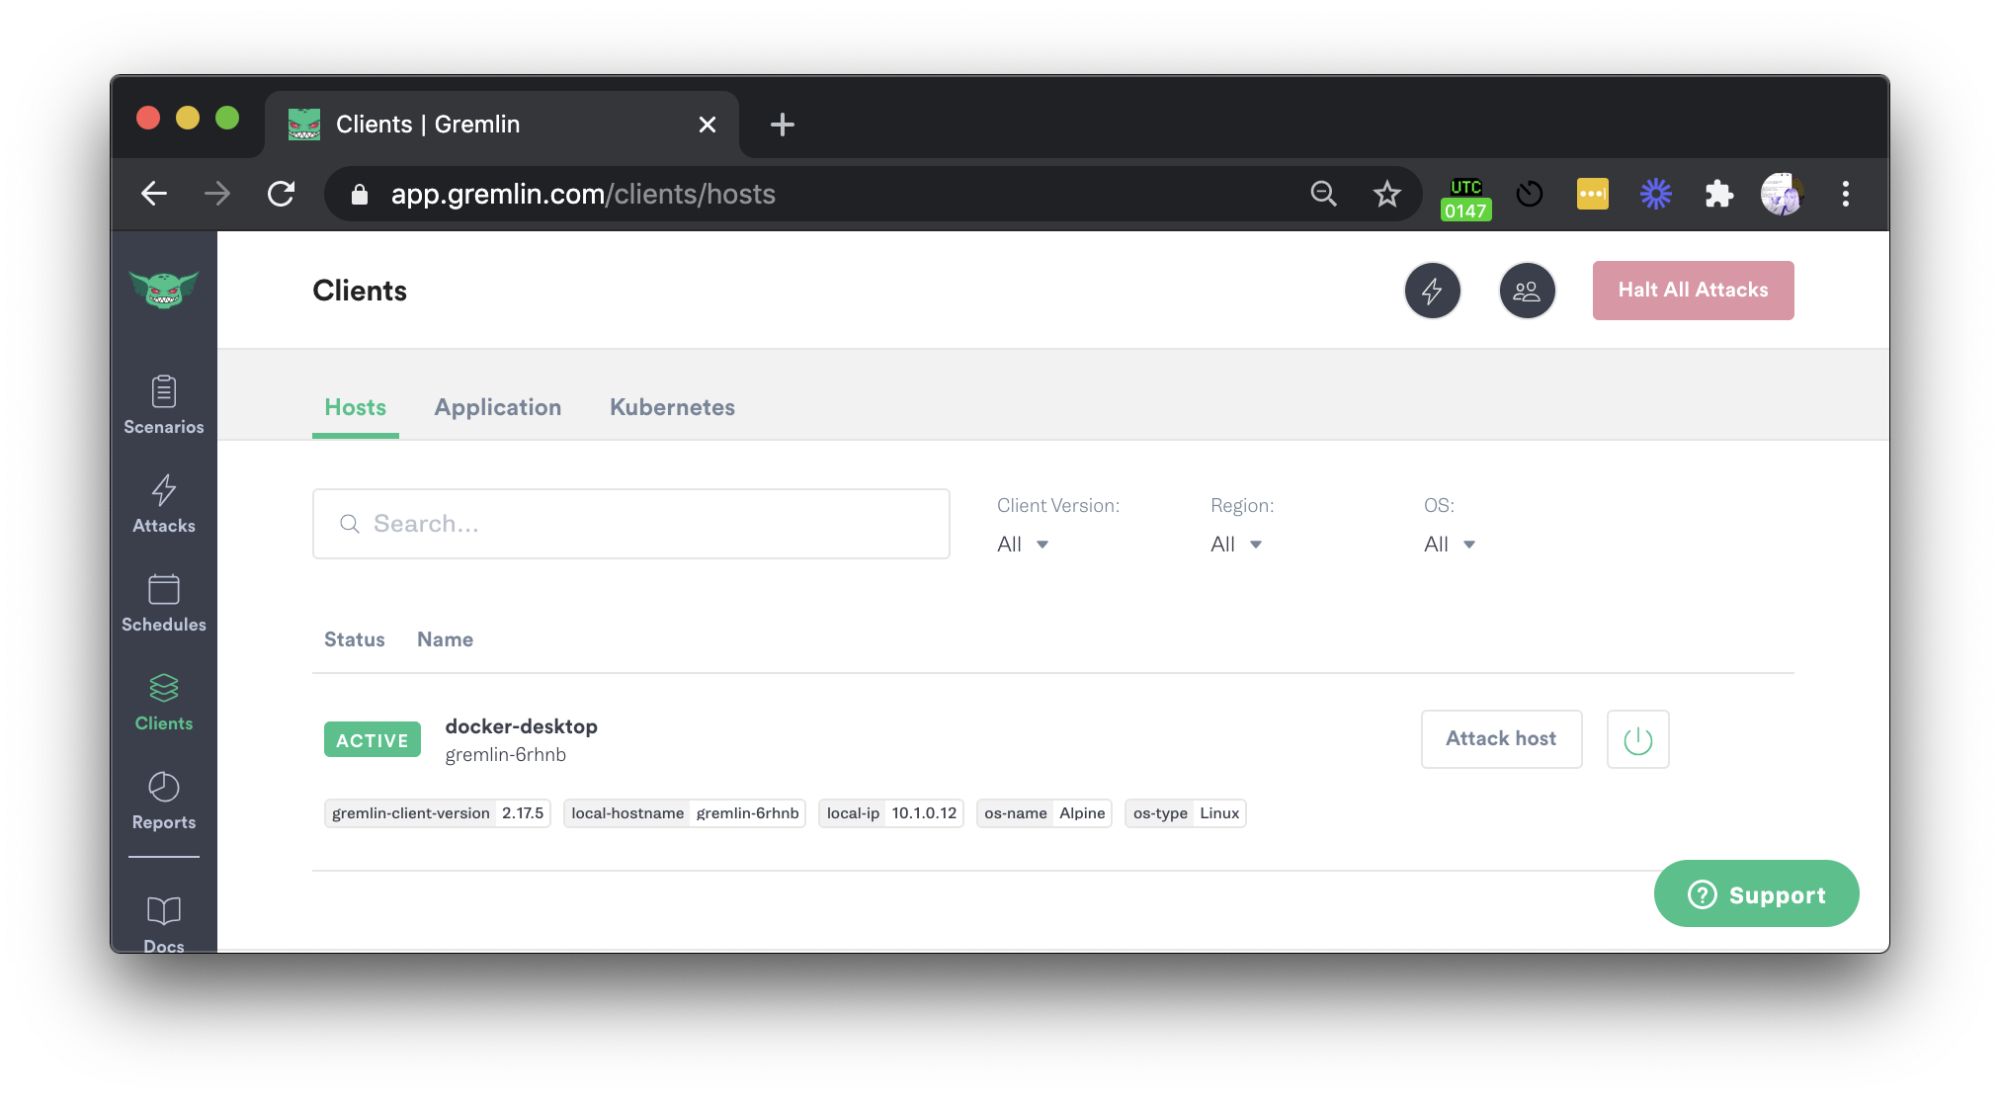
You'll now see Gremlin as an active client in the Gremlin UI:

Now you can run attacks! You can also keep this running for free forever :D Great work making it to the finish line!
Step 8 - Run your first Gremlin Scenario with Docker Desktop
We recommend spinning up a demo application to quickly learn all of Gremlin’s features. We’ve made this available for you here: https://github.com/gremlin/microservices-demo.
You can simply deploy this demo e-commerce application to your Docker Desktop Kubernetes cluster using the provided helm chart.
On your local machine clone the repo:
1git clone https://github.com/GoogleCloudPlatform/microservices-demo.git
Then, change directories to the directory we have just created: cd microservices-demo
To deploy the application:
1kubectl apply -f ./release/kubernetes-manifests.yaml
Wait until pods are in a ready state. To check the readiness run:
1kubectl get pods
Now visit localhost in your browser to view the Hipster Shop:

Step 9 - Run a Gremlin Scenario to validate reliability
We are going to start practicing Chaos Engineering by creating our first Gremlin Scenario. We want to validate our application’s reliability. Our hypothesis is, “When shutting down my cart service container, my entire application will not suffer downtime and existing data in my cart will not be lost since it’s stored in Redis. I expect that my application’s cart will be replaced by Kubernetes after it is shutdown”.
Going back to the Gremlin UI, select Attacks from the menu on the left and press the blue “New Attack” button. We’re going to target a Kubernetes resource, so click on the Infrastructure tab, then click on Kubernetes in the upper right.
We will be shutting down the “cartservice” containers. Gremlin has imported the objects from Kubernetes and we can see them in the UI. We can find the container we want to target by expanding the Deployments field and selecting "cartservice".
We will now go over to choosing the Gremlin. We will be doing a state Chaos Engineering Attack, so select “State” and choose “Shutdown” from the options. We will leave the delay set to 1 minute and turn off the reboot. Then click on the green Unleash Gremlin button.
You can view the state of the pods with kubectl:
1kubectl get pods
Also, make sure to check out the demo app to test user experience to see if your hypothesis is correct.
Experiment Results
Our hypothesis was, "When shutting down my cart service container, I will not suffer downtime and Kubernetes will give me a new one."
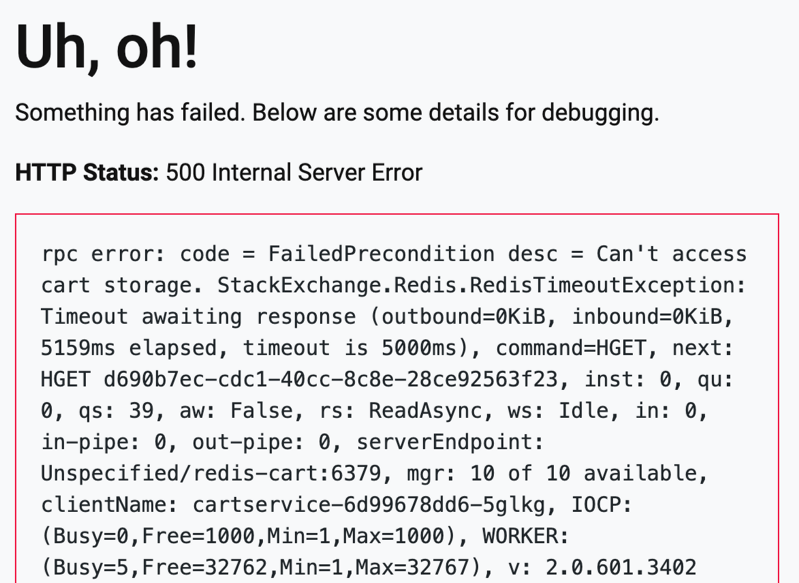
We didn't prove this to be correct. We actually saw that the Hipster Shop: Cloud-Native Microservices Demo Application demo did not gracefully handle shutdown.
It instead threw a 500 internal server error:

To mitigate this issue we would need to first investigate why we saw the error and look into the logs. For example, we can see the error "could not retrieve cart". When we run kubectl get pods we will see there is only one cartservice running and it has no redundancy. When we view cartservice.yaml we see that cart service uses Redis but it does not use clustered Redis.
Conclusion
You now have Gremlin up and running locally with Kubernetes and Docker Desktop. Now you can start running Chaos Engineering attacks and Scenarios with Gremlin. To learn more about Gremlin Attack types, visit the Gremlin Docs.
Related


Avoid downtime. Use Gremlin to turn failure into resilience.
Gremlin empowers you to proactively root out failure before it causes downtime. See how you can harness chaos to build resilient systems by requesting a demo of Gremlin.
Get started